
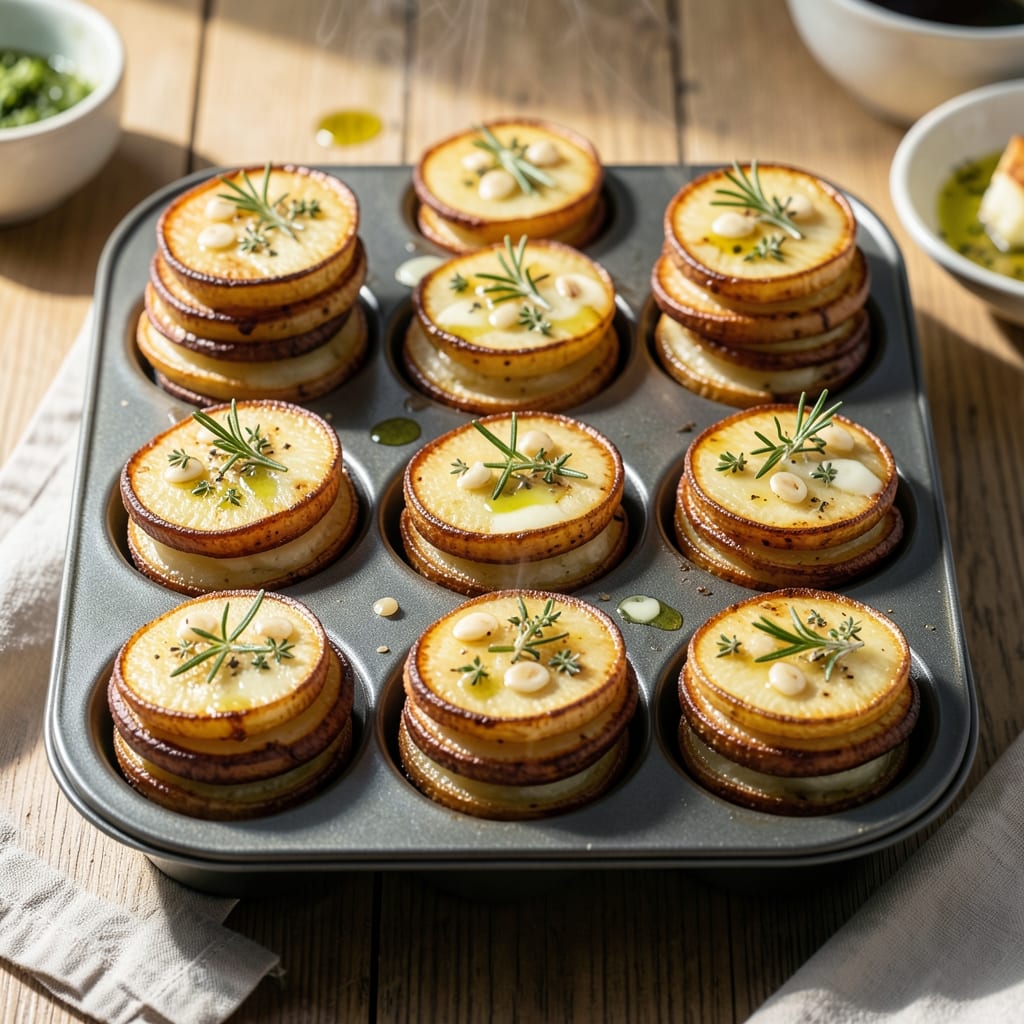
These potato stacks transform humble spuds into an elegant side dish that looks as impressive as it tastes. The muffin tin creates golden crisp edges while keeping the centers tender, and the buttery layers melt together beautifully.
I developed this method testing different potatoes and seasonings in my Austin kitchen. The key is slicing the potatoes uniformly and pressing them tightly into the tin. This ensures even cooking and that perfect crisp texture.
Each bite delivers buttery layers with a satisfying crunch. The stacks hold their shape when removed from the tin, making them ideal for serving at dinner parties or holiday meals.
Customize with herbs, cheese, or bacon for added flavor. Here’s how to make them perfectly every time.
Ingredients for Potato Stacks Recipe Muffin Tin
Pantry staples plus a few fresh herbs for stacks with crisp edges and buttery layers.
| Ingredient | Amount | Notes |
|---|---|---|
| Russet Potatoes 🥔 | 2 lb | Peeled, sliced 1/8-inch thick |
| Unsalted Butter 🧈 | ½ cup | Melted for brushing |
| Olive Oil 🫒 | 2 tbsp | For greasing muffin tin |
| Garlic Cloves 🧄 | 3 cloves | Minced finely |
| Fresh Rosemary 🌿 | 2 tbsp | Chopped, or 2 tsp dried |
| Fresh Thyme Leaves 🍃 | 1 tbsp | Or 1 tsp dried thyme |
| Parmesan Cheese 🧀 | ½ cup | Freshly grated |
| Kosher Salt 🧂 | 1 tsp | Divided for seasoning |
| Black Pepper 🌶️ | ½ tsp | Freshly ground preferred |
| Smoked Paprika 🌶️ | ½ tsp | Optional, for depth |
| Sharp Cheddar Cheese 🧀 | ½ cup | Shredded, optional topping |
The potatoes are the star here. Russets give you that perfect crisp edge and fluffy interior—Yukon Golds work too but stay a bit waxier. I grab mine from Central Market in Austin when they’re on sale, but any grocery store will do. Slice them thin and uniform (a mandoline helps) so they cook evenly. Pressing them tightly into the tin is key—no air gaps means better layers.
No fresh herbs? Dried work at one-third the amount (rosemary and thyme hold up fine). Skip the cheese for a simpler version, or swap in Gruyère or Pepper Jack for a twist. The butter can be replaced with olive oil for a dairy-free take (though the flavor changes). If you’ve got truffle oil lying around, a drizzle before serving takes these over the top.
Stacks reheat best in a toaster oven—keeps them crisp. Store leftovers in the fridge for up to 3 days (they’ll soften a bit). Freezing isn’t ideal since potatoes get mushy, but they’ll keep for 1 month if wrapped well. Always bring to room temp before reheating.
Why You’ll Love This Recipe
- No-Fuss Assembly: I just slice, layer, and bake—no fancy techniques or hard-to-find tools, just a muffin tin and a knife.
- Garlic-Rosemary Magic: The butter, garlic, and fresh rosemary between each potato slice make every bite rich and aromatic.
- Meal Prep Win: These keep well in the fridge, so I make a double batch for easy lunches or a quick side all week.
- Budget-Friendly Feast: Russet potatoes and a few pantry staples stretch far, making this a filling dish that doesn’t break the bank.
Step-by-Step Instructions for Potato Stacks in a Muffin Tin
Here’s how I make these stacks with perfect crispy edges every single time.
Step 1: Prep the Muffin Tin and Potato Slices
Preheat your oven to 400°F and generously brush the 2 tbsp olive oil into the cups of a standard muffin tin. This prevents sticking and helps the stacks release cleanly after baking.
While the oven heats, peel the 2 lb Russet Potatoes and slice them 1/8-inch thick using a sharp knife or mandoline. I keep the slices in a bowl of cold water to prevent browning while I finish prepping. Drain and pat them completely dry before using—this is crucial for crispiness.
Step 2: Layer the Potato Stacks with Seasonings
In a small bowl, mix the 1 tsp Kosher Salt, 0.5 tsp Black Pepper, and 0.5 tsp Smoked Paprika. This blend adds just the right amount of flavor without overpowering the potatoes.
Start layering the potato slices in the prepared muffin tin, slightly overlapping each slice. After every 2-3 layers, sprinkle a pinch of the seasoning mix, some minced 3 cloves Garlic Cloves, and a little of the chopped 2 tbsp Fresh Rosemary and 1 tbsp Fresh Thyme Leaves. This builds flavor in every bite.
Step 3: Add Butter and Cheese Between Layers
Melt the 0.5 cup Unsalted Butter and brush it generously over each layer of potatoes as you build the stacks. The butter seeps into the layers, creating that rich, buttery flavor and helping the edges crisp up beautifully.
When you reach the top of each muffin cup, sprinkle a generous amount of the 0.5 cup Parmesan Cheese over the potatoes. If you’re using the 0.5 cup Sharp Cheddar Cheese, add it now for an extra melty topping. Press down gently to compact the layers slightly.
Step 4: Bake Until Golden and Crisp
Bake in the preheated oven for 45-50 minutes until the tops are golden brown and the edges are crisp. You’ll know they’re done when a knife inserted into the center of a stack meets no resistance and the tops are beautifully browned.
About halfway through baking, I like to brush the tops with a little more melted butter for extra richness. Keep an eye on them toward the end—if they’re browning too quickly, tent the pan loosely with foil.
Step 5: Rest and Serve
Remove the stacks from the oven and let them rest in the pan for 5 minutes. This helps them set so they hold their shape when you remove them. Run a small knife around the edges of each stack to loosen before carefully lifting them out.
Serve warm, while the cheese is still gooey and the edges are at their crispiest. Each stack should have a golden, crispy exterior with tender, flavorful layers inside. The rosemary and thyme will be fragrant, and the parmesan adds a salty, savory finish to every bite.
Pro Tips For Making Potato Stacks Recipe Muffin Tin
- Pre-bake the slices: Par-cook the potato slices in the microwave for 3-4 minutes before stacking—I learned this the hard way after my first few batches stayed raw in the middle.
- Use melted butter: Brush the muffin tin with melted butter instead of oil for a richer crust, and make sure to get it in every nook of the tin.
- Skip thick slices: Cut the potatoes 1/8-inch thick or thinner, otherwise they won’t cook through in the muffin tin’s tight space.
- Press down hard: After stacking, press each potato stack firmly into the tin with the back of a spoon to keep them from toppling over while baking.
Storing and Reheating This potato stacks recipe muffin tin
Refrigerator Storage
Let your stacks cool completely before storing—about 1 hour at room temperature. Transfer to an airtight container with parchment between layers to prevent sticking. They’ll keep in the fridge for up to 3 days, though they’re best within 24 hours. ❄️
Reheating in Oven
Preheat your oven to 375°F and place stacks on a baking sheet. Reheat for 10-12 minutes until warmed through and the edges crisp up again. I always add a quick brush of melted butter at the end for freshness.
Toaster Oven Method
This is my go-to for small batches. Set the toaster oven to 375°F and reheat for 8-10 minutes. The direct heat keeps the edges crisp while warming the centers. Watch closely to avoid over-browning.
Freezer Storage
For longer storage, wrap individual stacks tightly in plastic wrap, then place in a freezer bag. They’ll last up to 1 month, but texture softens slightly. Thaw overnight in the fridge before reheating.
Microwave Option
When short on time, microwave on 50% power for 1-2 minutes, but expect softer edges. Add a paper towel over the plate to trap steam. Best for quick lunches when crispiness isn’t critical.
David always teases me for testing every reheating method—even the microwave. 💡
Nutrition Facts
Frequently Asked Questions
What’s the best potato type for stacks?
Russets work best for their starchy texture and crisp edges. Yukon Golds are a good second choice but stay slightly waxier. Always slice them 1/8-inch thick for even cooking.
Can I make these ahead of time?
Yes! Assemble the stacks, cover, and refrigerate up to 12 hours before baking. Add 5 minutes to the baking time if cooking straight from the fridge.
Why are my stacks not crispy?
Pat potato slices completely dry before layering. Also, avoid overcrowding the muffin tin—this traps steam. Bake at 400°F for the best crisp.
Can I use a different pan?
A mini muffin tin works for bite-sized portions. For larger stacks, use a ramekin or oven-safe mold. Adjust baking time as needed.

- Progresso Recipe Starters Creamy Parmesan Basil Cooking Sauce: Rich Herb-Infused Base for Pasta and More - November 3, 2026
- Pudding Recipe With Egg Yolks: Silky Smooth Custard in Minutes - November 3, 2026
- Pudding Pops Recipe Cook and Serve: Silky Frozen Treats Without the Machine - November 3, 2026