
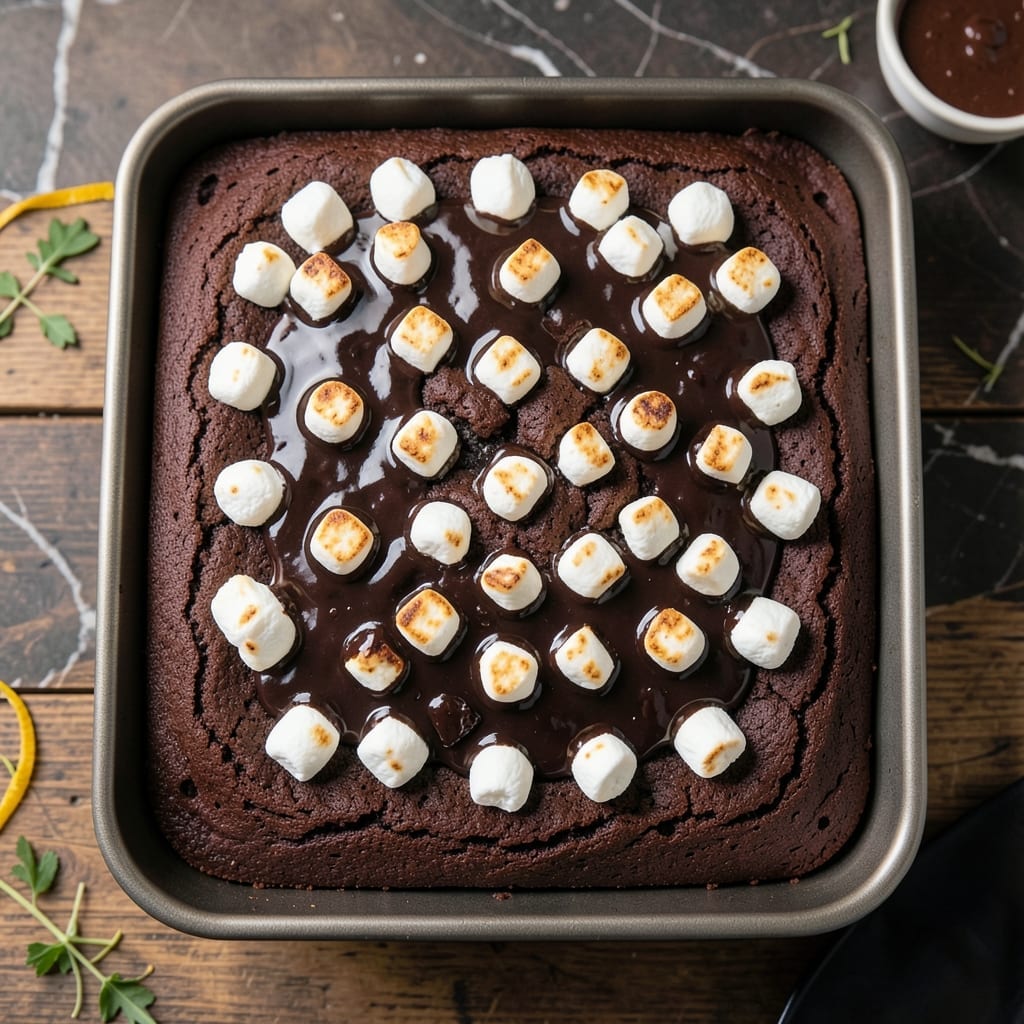
This chocolate poke cake takes dessert to a new level with layers of rich, moist cake and gooey marshmallow filling. The secret is in the strategic poking and pouring that creates pockets of sweetness in every bite.
I developed this recipe to combine the comfort of homemade cake with the fun of a s’mores-inspired treat. The chocolate base stays tender while the marshmallow topping develops a perfect golden finish under the broiler.
What you get is a showstopping dessert that serves a crowd with minimal effort. The contrast of warm, melty marshmallows against the cool, fudgy cake makes this irresistible.
Ideal for potlucks, birthdays, or when you need to satisfy a serious chocolate craving. The technique ensures every slice has the perfect balance of textures.
Ingredients for Marshmallow Chocolate Poke Cake
Rich, moist cake meets melty marshmallow magic. Probably have most of this already.
| Ingredient | Amount | Notes |
|---|---|---|
| All-Purpose Flour 🌾 | 2 cups | Sifted for lighter texture |
| Granulated Sugar 🍚 | 2 cups | Fine white sugar preferred |
| Unsweetened Cocoa Powder 🍫 | ¾ cup | Dutch-process for richness |
| Baking Powder 🧂 | 2 tsp | Fresh for best rise |
| Baking Soda 🧂 | 1 tsp | Balances acidity in cocoa |
| Salt 🧂 | 1 tsp | Enhances chocolate flavor |
| Large Eggs 🥚 | 2 whole | Room temperature for even mixing |
| Buttermilk 🥛 | 1 cup | Full-fat for richness |
| Vegetable Oil 🫒 | ½ cup | Neutral flavor preferred |
| Vanilla Extract 🌿 | 2 tsp | Pure extract for best flavor |
| Hot Water 💧 | 1 cup | Blooms cocoa powder |
| Mini Marshmallows 🍬 | 4 cups | For gooey filling and topping |
| Sweetened Condensed Milk 🥛 | 1 can | 14 oz can, for poke filling |
| Semi-Sweet Chocolate Chips 🍫 | 1 ½ cups | For melting over marshmallows |
The cocoa powder is non-negotiable here—Dutch-process from Hershey’s or Ghirardelli gives that deep, dark color and flavor. Buttermilk might require a special trip, but it’s worth it (or make your own with milk and vinegar). King Arthur flour is my go-to for baking, but any all-purpose works. For the marshmallows, Jet-Puffed or Kraft mini ones melt perfectly without turning grainy.
No buttermilk? Milk plus 1 tbsp vinegar works in a pinch. Out of Dutch-process cocoa? Regular unsweetened cocoa is fine, but add a pinch of baking soda to compensate. Swap chocolate chips for chopped bars if that’s what you’ve got. The sweetened condensed milk can be Carnation or Eagle Brand—both are solid. Skip the mini marshmallows? Regular ones work, just chop them smaller.
Leftovers keep 3-4 days in an airtight container at room temp. The cake actually tastes better the next day once everything settles. For longer storage, wrap slices tightly and freeze for up to 3 months.
Why You’ll Love This Recipe
- I’ll be real: it actually tastes better the next day, if it lasts that long.
- No-Fuss Mixing: I dump the dry stuff—flour, cocoa, sugar—right into one bowl, no fancy steps.
- Rich Chocolate Hit: That deep cocoa flavor with the gooey marshmallows on top? Ridiculously good.
- Party or Pajamas: Here’s what sold me—it’s just as welcome at a birthday as it is on my couch with a fork.
Step-by-Step Instructions for Marshmallow Chocolate Poke Cake
Here’s how I create this decadent dessert with rich layers everyone loves.
Step 1: Mix and Bake the Chocolate Cake Base
Preheat your oven to 350°F and grease a 9×13-inch baking pan. In a large bowl, whisk together the 2 cups All-Purpose Flour, 2 cups Granulated Sugar, 0.75 cup Unsweetened Cocoa Powder, 2 tsp Baking Powder, 1 tsp Baking Soda, and 1 tsp Salt until fully combined.
In another bowl, beat the 2 whole Large Eggs, 1 cup Buttermilk, 0.5 cup Vegetable Oil, and 2 tsp Vanilla Extract. Gradually add the dry ingredients, mixing just until smooth. Stir in the 1 cup Hot Water—the batter will be thin, but that’s normal for this cake.
Pour the batter into the prepared pan and bake for 25-30 minutes, or until a toothpick inserted in the center comes out clean. Let the cake cool for 10 minutes before moving to the next step.
Step 2: Poke and Fill with Sweetened Condensed Milk
While the cake is still warm, use the handle of a wooden spoon to poke holes all over the surface. Make sure the holes are deep but don’t go all the way through the cake—you want the filling to seep in and soak the layers without leaking out.
Slowly pour the 1 can Sweetened Condensed Milk evenly over the cake, letting it fill each hole. The cake will absorb most of the liquid as it cools, creating a moist, rich base. Let it sit for 15 minutes to soak in completely.
Step 3: Add the Marshmallow Layer
Once the cake has absorbed the condensed milk, sprinkle all 4 cups Mini Marshmallows evenly over the top. Press them down lightly so they stick to the cake’s surface. This ensures they stay in place when you add the chocolate layer.
Place the pan under the broiler for 1-2 minutes, watching closely to avoid burning. You want the marshmallows to toast just enough to turn golden brown on top. Remove from the oven as soon as they’re lightly browned.
Step 4: Melt Chocolate Chips for the Final Layer
Sprinkle all 1.5 cups Semi-Sweet Chocolate Chips evenly over the toasted marshmallows. Return the pan to the oven for 2-3 minutes, just long enough for the chocolate chips to soften. Use a spatula to gently spread the melted chocolate into an even layer over the marshmallows.
Let the cake cool completely before slicing. The chocolate will set as it cools, creating a glossy, decadent topping. Serve at room temperature for the best texture—warm enough to be gooey but cool enough to hold its shape.
Pro Tips For Making Marshmallow Chocolate Poke Cake
- Cool the Cake Completely: Poke the holes only after the cake has cooled for at least 1 hour—I learned this the hard way when my marshmallow topping melted into a gooey mess.
- Sift the Cocoa: Always sift the unsweetened cocoa powder to break up lumps, or you’ll end up with bitter chocolate flecks in your cake.
- Skip Overmixing: Mix the batter just until the flour disappears; overworking it makes the cake dense instead of light and fluffy.
- Use Hot Fudge: Pour warm chocolate fudge into the poke holes—it soaks in better and pairs perfectly with the marshmallows on top.
Storing and Reheating This Recipe
Room Temperature Storage
Let the cake cool completely before storing. Cover with plastic wrap or place in an airtight container at room temperature. It stays fresh for 3-4 days—the flavors actually deepen as the cake rests. 💡
Refrigerator Storage
For longer freshness, refrigerate in an airtight container for up to 1 week. Let slices come to room temperature for 30 minutes before serving to restore the gooey texture of the marshmallows.
Freezing Instructions
Wrap individual slices tightly in plastic wrap and place in a freezer-safe bag. Freeze for up to 3 months. Thaw overnight in the refrigerator before bringing to room temperature. ❄️
Reheating Slices
For warm, melty marshmallows, microwave a slice for 15-20 seconds on 50% power. Alternatively, place on a baking sheet in a 300°F oven for 5-10 minutes until warmed through.
Serving Warm
If reheating the entire cake, cover with foil and warm in a 300°F oven for 10-15 minutes. Remove foil for the last 2 minutes to refresh the chocolate topping’s shine.
Nutrition Facts
Frequently Asked Questions
Can I use regular marshmallows instead of mini?
Yes, but chop them into smaller pieces first. Mini marshmallows melt more evenly and create better coverage. Regular ones may leave gaps or take longer to toast.
Why does the cake need to cool before adding marshmallows?
Cooling for 10 minutes prevents the marshmallows from melting instantly. The warm cake still softens them slightly for the perfect gooey texture without turning into a soupy mess.
How do I prevent the chocolate from seizing when melting?
Use the oven method described—2-3 minutes at low heat. Avoid direct microwave heating, which can cause uneven melting. Gently spreading with a spatula helps distribute heat evenly.
Can this cake be made a day ahead?
The flavors deepen overnight. Store at room temperature in an airtight container and add the chocolate topping just before serving for the best presentation.

- BBQ Bison Recipe Steaks: Smoky Grill Mastery with Bold Flavor - September 28, 2026
- Chicken Breast Recipe Tender: Brine-Soaked Juiciness Without Overcooking - September 28, 2026
- Baked Chicken Recipe for Acid Reflux: Gentle Flavors for Sensitive Stomachs - September 28, 2026