
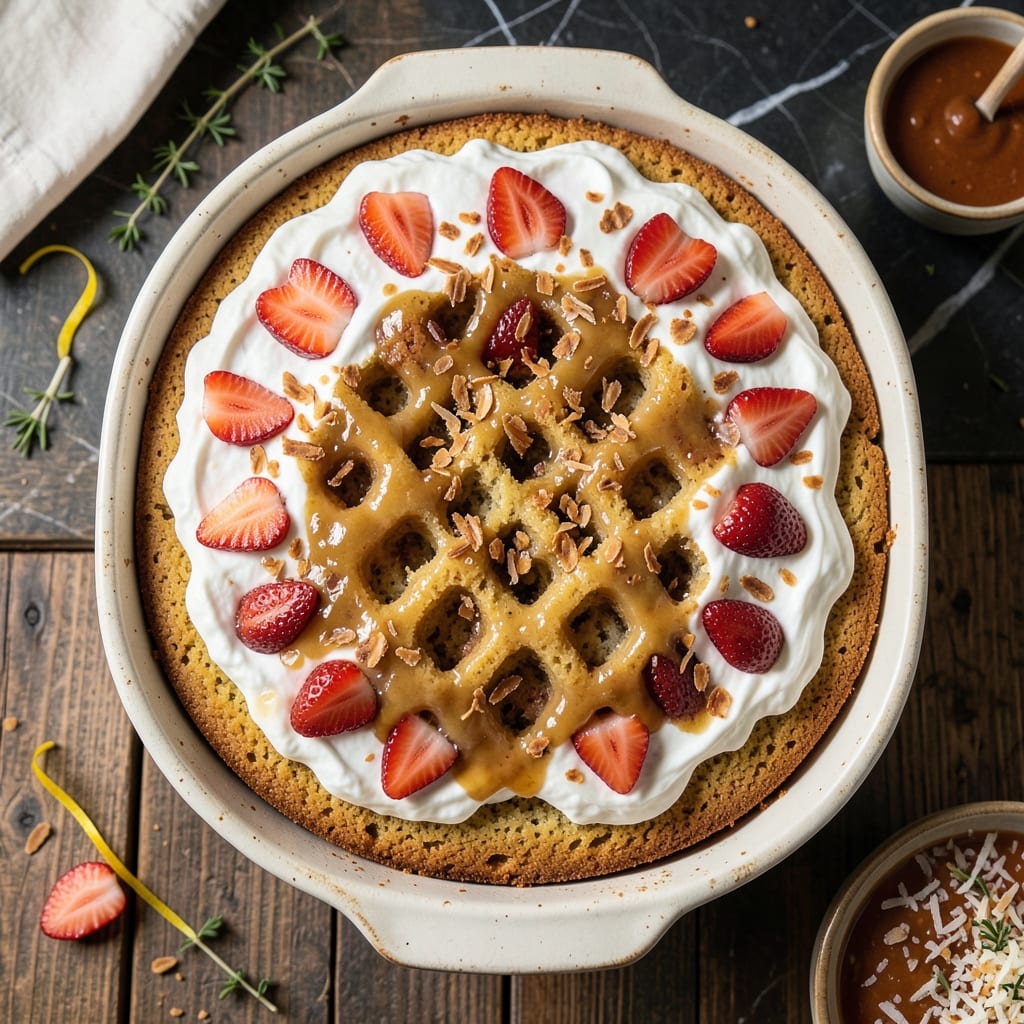
There’s something magical about a dessert that practically makes itself while you wait. I developed this method after years of testing cakes that stayed moist and flavorful for days.
The secret lies in poking holes in a warm cake, then pouring sweetened condensed milk over it. This creates pockets of creamy richness that transform the entire dessert into something extraordinary.
What emerges is a cake so creamy and decadent, each bite delivers a perfect balance of soft cake and luscious pudding-like filling. The condensed milk infuses every inch with sweetness and moisture.
Serve it chilled for the best texture, and watch it disappear. This is the kind of dessert that creates lasting memories.
Ingredients for Poke Cake Recipe with Condensed Milk
Pantry staples plus a can of magic. Nothing exotic, just rich comfort.
| Ingredient | Amount | Notes |
|---|---|---|
| All-Purpose Flour 🌾 | 2 cups | Sifted for lighter texture |
| Granulated Sugar 🍚 | 1 ½ cups | Divided for cake and topping |
| Baking Powder ⚗️ | 2 tsp | For proper rise |
| Salt 🧂 | ½ tsp | Balances sweetness |
| Large Eggs 🥚 | 2 whole | Room temperature preferred |
| Vegetable Oil 🫒 | ½ cup | Neutral flavor for cake |
| Vanilla Extract 🌿 | 2 tsp | Pure extract for best flavor |
| Whole Milk 🥛 | ¾ cup | For cake batter |
| Sweetened Condensed Milk 🥛 | 1 can | 14 oz can, for poking |
| Heavy Whipped Cream ☁️ | 1 cup | For topping, chilled |
| Powdered Sugar 🍚 | ¼ cup | For dusting topping |
| Unsalted Butter 🧈 | 2 tbsp | Melted for cake batter |
The condensed milk is non-negotiable here—Eagle Brand is the gold standard (the label’s been around since the 1800s for a reason). Grab it from the baking aisle at any Walmart or Kroger. The whole milk in the batter matters too—don’t swap for skim or the texture gets dry. If you’re baking often, invest in pure vanilla extract (the imitation stuff tastes like chemicals).
No sweetened condensed milk? Dulce de leche works in a pinch but it’s sweeter, so cut back on sugar elsewhere. Out of whole milk? 2% in a pinch (but don’t tell anyone). The cake base is forgiving—yellow or white cake mix saves time if you’re short on flour. For extra richness, swap the vegetable oil for melted coconut oil (just cool it first).
The cake tastes better after 24 hours—the condensed milk fully absorbs overnight. Store covered at room temp for 3 days, or refrigerate for up to 5 days. Freezing’s not ideal (the texture gets weird), but it’s doable for 1 month if wrapped tight.
Why You’ll Love This Recipe
- One Bowl Wonder: I mix everything right in one bowl—flour, sugar, eggs—and it still turns out moist every time.
- Sweet Milk Magic: The condensed milk soaks into the warm cake, creating pockets of rich, caramel-like sweetness in every bite.
- Party-Ready Dessert: I’ve served this at birthdays, potlucks, and even a Tuesday night treat—always disappears fast.
- Budget-Friendly Feast: A can of condensed milk and pantry staples feed a crowd for pennies. Honestly, it’s my go-to when I need to impress without spending much.
Step-by-Step Instructions for Condensed Milk Poke Cake
This method guarantees a moist, creamy cake with minimal effort and maximum flavor.
Step 1: Prepare and Bake the Cake Base
Preheat your oven to 350°F and grease a 9×13-inch baking pan. In a large bowl, whisk together the 2 cups All-Purpose Flour, 1.5 cups Granulated Sugar, 2 tsp Baking Powder, and 0.5 tsp Salt until fully combined.
Add the 2 whole Large Eggs, 0.5 cup Vegetable Oil, 2 tsp Vanilla Extract, 0.75 cup Whole Milk, and 2 tbsp Unsalted Butter (melted). Mix until just smooth—overmixing creates a dense cake. Pour the batter into the prepared pan and bake for 25-30 minutes until a toothpick inserted in the center comes out clean.
Step 2: Poke and Soak with Sweetened Condensed Milk
As soon as the cake comes out of the oven, use the handle of a wooden spoon to poke holes all over the surface. I like to space them about 1 inch apart for even distribution. The holes should go about halfway down—deep enough to hold the liquid but not all the way through.
Slowly pour the entire 1 can Sweetened Condensed Milk over the hot cake, letting it seep into the holes. Here’s the thing—it’ll look like too much at first, but the cake will absorb it all. Let it cool completely at room temperature, which takes about 1 hour. This soaking step transforms the cake into a rich, pudding-like texture.
Step 3: Whip the Cream Topping
Once the cake is fully cooled, whip the 1 cup Heavy Whipped Cream and 0.25 cup Powdered Sugar together until stiff peaks form. I use a chilled bowl and beaters for this—it helps the cream whip faster and hold its shape better.
Use a spatula to spread the whipped cream evenly over the entire surface of the cake. The contrast between the light, fluffy topping and the dense, creamy cake below is what makes this dish so special. For a cleaner look, you can pipe the cream using a star tip, but a simple spread works just as well.
Step 4: Chill and Serve
Refrigerate the cake for at least 2 hours before serving to allow the flavors to meld and the condensed milk to fully set. This chilling time is non-negotiable—it’s what gives the cake its signature creamy texture.
When ready to serve, slice into squares and enjoy cold. The cake will keep in the refrigerator for up to 5 days, though it’s best within the first 48 hours when the textures are at their peak. Each bite should deliver a perfect balance of moist cake, sweet condensed milk, and light whipped cream.
Pro Tips For Making Poke Cake Recipe With Condensed Milk
- Cool the Cake First: I learned this the hard way—poke the holes only after the cake has cooled for 15-20 minutes, or the condensed milk will just pool on the surface instead of soaking in.
- Widen the Holes: Use the handle of a wooden spoon to gently widen the poke holes—about ½ inch across—so the condensed milk actually penetrates deep into the cake.
- Skip Cold Condensed Milk: After ruining a batch with chilled condensed milk, I now warm it slightly (10-15 seconds in the microwave) to help it flow smoothly into the cake.
- Press Down Gently: When pouring the condensed milk, press down lightly on the cake with a spatula to help it absorb faster—no need to drown it, just let it soak in evenly.
Essential Equipment for This Dish
Baking Pan
Use a 9×13-inch metal baking pan—this size ensures even baking and the right thickness for poking. I prefer Wilton or USA Pan brands for their non-stick coating. Avoid glass pans, as they can cause the edges to overbake before the center is done.
Mixing Bowls
A large stainless steel mixing bowl (at least 4 quarts) gives you room to combine ingredients without spills. I keep one from All-Clad in my kitchen—they’re durable and nest for easy storage. For the whipped cream, a chilled glass or metal bowl helps achieve stiff peaks faster.
Wooden Spoon
The handle of a sturdy wooden spoon is perfect for poking holes—about ¼-inch wide. I use one from OXO; the flat handle creates clean holes without tearing the cake. Avoid plastic utensils, as they can melt if the cake is too hot.
Electric Mixer
For the whipped cream topping, a hand mixer or stand mixer is essential. My KitchenAid stand mixer is a workhorse, but a Cuisinart hand mixer works just as well. Chill the beaters for 10 minutes before whipping for best results. 💛
Cooling Rack
Let the cake cool on a wire rack to prevent the bottom from getting soggy. A simple stainless steel rack from Wilton costs under $10 and lasts forever. Place a sheet of parchment under the rack to catch any drips from the condensed milk.
Measuring Tools
Accurate measurements matter here. Use dry measuring cups for flour and sugar, and liquid measuring cups for milk and oil. I love Pyrex for liquids—the clear markings make it easy to see at eye level. A set of stainless steel measuring spoons is a must for the smaller quantities.
Nutrition Facts
Frequently Asked Questions
Can I use evaporated milk instead?
No, evaporated milk lacks the sugar content needed for this recipe. The sweetness of condensed milk is essential for flavor and texture.
How deep should the holes be?
Poke holes about halfway down, spacing them 1 inch apart. This ensures even absorption without breaking through the cake.
Why does my cake get soggy?
This usually happens if the condensed milk is added before the cake finishes baking. Always poke and pour immediately after removing from the oven.
Can I make this ahead of time?
Yes! It actually tastes better after 24 hours as the condensed milk fully absorbs. Store covered in the fridge for up to 5 days.

- Potato Candy Recipe 1933: Vintage Peanut Butter Roll Delight - October 30, 2026
- Potato Chip Cookie Recipe With Pecans: Buttery Crunch Meets Nutty Richness - October 30, 2026
- Potato Patty Recipe No Egg: Crispy Edges Without the Binder - October 30, 2026