
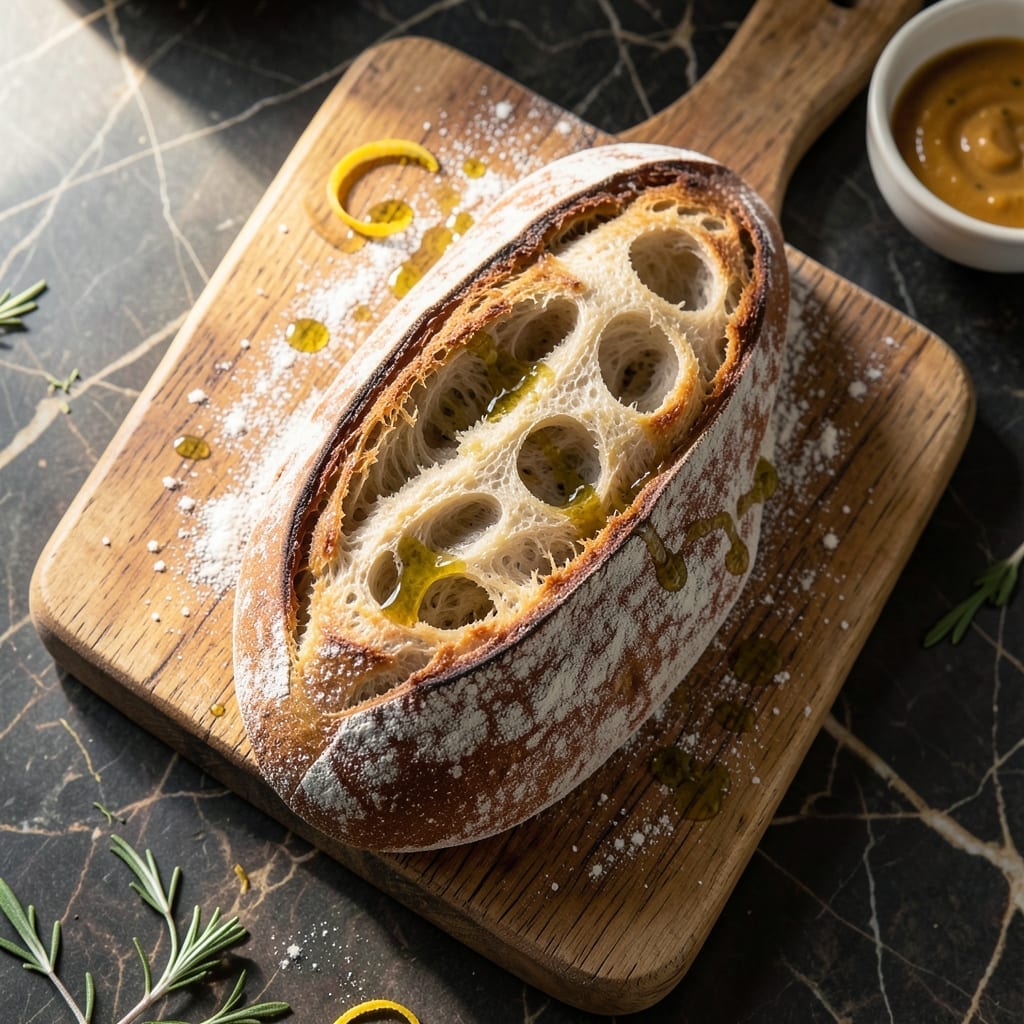
This ciabatta recipe delivers that signature artisan crust and open, airy interior you’d expect from a professional bakery. The secret lies in a high-hydration dough and patient fermentation.
Unlike denser breads, this version requires minimal kneading but demands precise timing. The sticky, slack dough transforms during its overnight rest, developing complex flavors.
What emerges from the oven is bread with a chewy, hole-filled crumb and a crisp, golden crust. It’s versatile enough for sandwiches, dipping, or simply enjoying with olive oil.
Mastering this technique takes practice, but the results are worth the effort. The process rewards patience with bread that rivals any bakery loaf.
Ingredients for Ciabatta Bread Recipe Jamie Oliver
Eight ingredients transform into bakery-quality ciabatta with that signature open crumb and crisp crust.
| Ingredient | Amount | Notes |
|---|---|---|
| Bread Flour 🌾 | 4 cups | High protein content essential |
| Water 💧 | 2 ½ cups | Room temperature, 75-80°F |
| Active Dry Yeast 🍞 | ¼ tsp | Instant yeast works too |
| Sea Salt 🧂 | 1 ½ tsp | Fine grain preferred |
| Extra-Virgin Olive Oil 🫒 | ¼ cup | For dough and bowl |
| All-Purpose Flour 🌾 | ½ cup | For dusting work surface |
| Semolina Flour 🌾 | ¼ cup | For dusting baking sheet |
| Cornmeal 🌽 | 2 tbsp | Alternative to semolina |
The flour is non-negotiable here. Bread flour with at least 12% protein content provides the gluten structure needed for that signature chewy interior and open crumb. King Arthur or Bob’s Red Mill are reliable brands. The yeast must be fresh—check the expiration date. Active dry and instant are interchangeable, but don’t use rapid-rise as it lacks the slow fermentation needed for flavor development.
No bread flour? All-purpose flour with 1 tbsp vital wheat gluten per cup can substitute in a pinch. Water temperature matters—too hot kills yeast, too cold slows activation. 80°F is ideal. Sea salt can be swapped for kosher salt at 1:1 ratio, but avoid iodized table salt. The olive oil should be high quality since it contributes to flavor—California Olive Ranch is a solid grocery store option.
The dough requires overnight fermentation at room temperature (70-75°F). Store flour in airtight containers in a cool, dark place for up to 6 months. Yeast keeps in the fridge for 1 year unopened or 3 months once opened. Always bring refrigerated dough to room temperature before shaping.
Why You’ll Love This Recipe
- No-Knead Magic: I love that this ciabatta comes together with just flour, water, yeast, salt, and olive oil—no fancy techniques, just mix and let it rise.
- Olive Oil Richness: The extra-virgin olive oil gives it that golden crust and a subtle depth that plain bread just can’t match.
- Sandwich Superstar: Honestly, it’s my go-to for paninis, dipping in soup, or even just slathered with butter and jam.
- Budget Bake: A bag of bread flour and a few pantry staples make two big loaves—way cheaper than buying artisanal ciabatta at the store.
Step-by-Step Instructions for Ciabatta Bread
Master the technique for achieving that signature open crumb and crisp crust with professional precision.
Step 1: Activate the Yeast and Create the Biga
In a large mixing bowl, combine the 4 cups Bread Flour with the 0.25 tsp Active Dry Yeast and 1.5 tsp Sea Salt. Gradually add the 2.5 cups Water while mixing with a wooden spoon until a shaggy dough forms. The dough will be extremely wet and sticky—this high hydration is essential for ciabatta’s characteristic texture.
Add the 0.25 cup Extra-Virgin Olive Oil and continue mixing for another 2 minutes until fully incorporated. Cover the bowl with plastic wrap and let rest at room temperature for 12-18 hours. You’ll know it’s ready when the surface is bubbly and the dough has nearly doubled in volume.
Step 2: Perform the Fold and Turn Method
After the initial rise, dust your work surface lightly with the 0.5 cup All-Purpose Flour. Using a dough scraper, turn the dough out onto the floured surface. The dough will be very sticky and loose—this is normal for high-hydration dough.
Perform a series of 3-4 folds and turns, spacing them about 30 minutes apart. To fold, lift one side of the dough and fold it over itself, then rotate the dough 90 degrees and repeat. This builds strength in the gluten network without kneading, which would deflate the air bubbles we’ve worked to create.
Step 3: Shape and Final Proof
After the final fold, let the dough rest uncovered for 15 minutes. Then, using your dough scraper, divide the dough into 4 equal portions. Shape each portion into an oblong loaf by gently stretching and folding the dough—don’t press too hard or you’ll squeeze out the air.
Place the loaves on a baking sheet dusted with the 0.25 cup Semolina Flour or 2 tbsp Cornmeal, spacing them at least 3 inches apart. Dust the tops lightly with more semolina or all-purpose flour. Cover with a damp towel and let proof at room temperature for 1-2 hours, or until nearly doubled in size and jiggly when shaken gently.
Step 4: Bake to Perfection
Preheat your oven to 450°F with a baking stone or inverted baking sheet inside for at least 30 minutes. Just before baking, use your fingers to dimple the surface of each loaf deeply—this creates ciabatta’s signature rustic appearance and helps the bread expand properly.
Carefully transfer the loaves (along with the semolina-dusted parchment or baking sheet) onto the preheated stone. Bake for 20-25 minutes until the crust is deep golden brown and the internal temperature reaches 205-210°F. The loaves should sound hollow when tapped on the bottom.
Step 5: Cool Completely Before Serving
Transfer the baked ciabatta to a wire rack and let cool completely for at least 1 hour. I know the aroma is tempting, but slicing too soon will result in a gummy crumb. The cooling period allows the interior structure to set properly.
Serve at room temperature, sliced horizontally for sandwiches or torn into chunks for dipping in olive oil. The crust should shatter slightly when cut, revealing an open, irregular crumb structure speckled with air pockets—this is the hallmark of authentic ciabatta.
Pro Tips For Making Ciabatta Bread Recipe Jamie Oliver
- Hydrate the Flour: Use slightly more water than you think—ciabatta dough should be sticky and slack, almost like a thick batter. I learned this the hard way after making dense loaves with too little hydration.
- Proof Overnight: Let the dough rise in the fridge for 12-16 hours. It develops deeper flavor and a lighter texture, and you’ll wake up to dough ready for shaping.
- Skip the Over-Flouring: Resist the urge to add extra flour when handling the sticky dough—it’ll ruin the open crumb structure. Wet hands work better than dusting with flour.
- Bake Hot and Fast: Crank your oven to its highest setting (at least 450°F) and bake with steam for the first 10 minutes. This gives ciabatta its signature chewy crust and airy interior.
Essential Equipment for ciabatta bread recipe jamie oliver
Mixing Bowl
A large, wide stainless steel or ceramic mixing bowl is essential for handling the high-hydration dough. I recommend a 5-6 quart capacity to give the dough room to expand during its 12-18 hour rest. The OXO Good Grips mixing bowl set works perfectly for this.
Dough Scraper
This sticky dough requires a good scraper for handling. A flexible plastic dough scraper helps lift and fold the slack dough without tearing. I use the Ateco 1303 model—it’s sturdy and fits comfortably in my hand. 💪
Baking Stone
For that professional bakery crust, a baking stone or steel is non-negotiable. It mimics a brick oven by holding and radiating heat evenly. Preheat it in your oven for at least 30 minutes before baking. The Pizza Stone from Old Stone Oven is a great budget-friendly option.
Parchment Paper
Transferring the delicate, dimpled loaves to the oven is tricky. Use pre-cut parchment sheets (I like Reynolds Kitchens) dusted with semolina or cornmeal. This prevents sticking and makes it easy to slide the loaves onto your preheated stone.
Digital Thermometer
Precision matters with ciabatta. A digital instant-read thermometer ensures your bread reaches the perfect internal temperature of 205-210°F. I trust my ThermoWorks Thermapen—it gives accurate readings in just 2-3 seconds. 🌡️
Cooling Rack
Letting the bread cool properly is just as important as baking it. A wire cooling rack allows air to circulate around the loaves, preventing a soggy bottom. The OXO Good Grips cooling rack has a non-slip base that keeps it steady on my countertop.
Nutrition Facts
Frequently Asked Questions
Why is my dough so sticky?
High hydration is essential for ciabatta’s airy texture. The dough should be very sticky—this is normal! Use wet hands and a dough scraper to handle it.
Can I use all-purpose flour instead of bread flour?
You can, but add 1 tbsp vital wheat gluten per cup to compensate for the lower protein. Bread flour gives the best structure for that signature open crumb.
How do I know when the bread is done?
Look for a deep golden brown crust and an internal temperature of 205-210°F. The loaves should sound hollow when tapped on the bottom.
What if my bread didn’t rise enough?
Check your yeast freshness and ensure the room temperature was 70-75°F during fermentation. The initial rest takes 12-18 hours—patience is key!

- Beyond Burger Recipe Ideas: Plant-Based Creativity for Every Meal - September 28, 2026
- BBQ Bison Recipe Steaks: Smoky Grill Mastery with Bold Flavor - September 28, 2026
- Chicken Breast Recipe Tender: Brine-Soaked Juiciness Without Overcooking - September 28, 2026